Getting Started with C/C++
Certain tasks are too performance intensive to implement in Lua, these tasks are implemented in C. Currently the following tasks are done in C:
- Vertex Terrain Generation
- Biome and Climate assignment
- Particles
TIP
This is considered an advanced topic. If you're new, try Getting Started with Lua
Prerequisites
- Git
- Visual Studio 2017 or later Desktop development with C++
- When using a different IDE than Visual Studio for development only the build tools is enough.
- CMake if using the template, or an IDE that has CMake bundled like CLion
Getting started
C Mods have a file structure very familiar to normal Lua mods. The root folder contains a modInfo.lua file, exactly like a normal Lua mod. For more information on this check out the Getting Started with Lua page. Additionally the root folder contains a lib folder. This lib folder contains library files which the game will load. On windows these library files have the .dll extension.
The easiest way to get started is by cloning either the official example repository or the template made by suppergerrie2. The template has the benefit of being a clean setup without the other Lua mod examples, and does not require Visual Studio, allowing you to program on Linux. Note that both repositories need to be cloned with the --recurse-submodules.
Official repository
The official example repository contains an example C Mod that can be found in Examples\src\FlatTerrain. The Windows\FlatTerrainMod.sln can be opened in Visual Studio. When opening the project it may ask to be updated to the latest version, let it do that. If it doesn't ask it and building fails with The build tools for Visual Studio 2017 (Platform Toolset = 'v141') cannot be found you can manually upgrade the project by right clicking the solution and clicking Retarget solution. 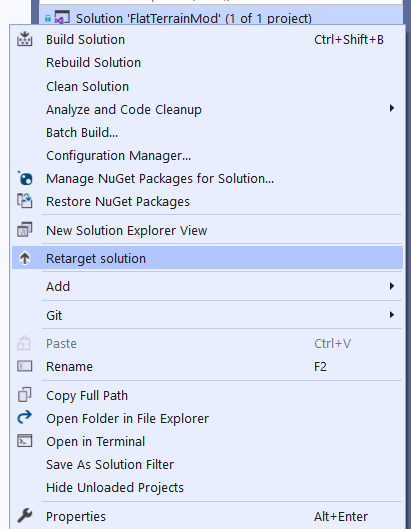 the mod can be compiled by
 Build -> Build FlatTerrainMod. This will generate a dll file in Windows\Build\. This dll file should be moved into your mod's lib folder. 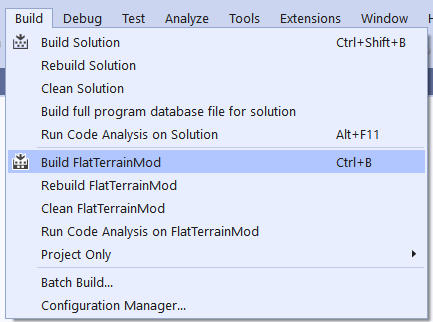
Template
If using the template the project can be opened using any IDE that supports CMake, or compiled manually from the command line. The template will combine the modInfo.lua and create the lib folder for you, the resulting folder can be found in the build folder and is named based on the mod id configured at the start.
The template is setup as a GitHub template, thus it can be easily used to create your own GitHub repository by going to the repository and pressing Use this template. This will then ask you to enter the name of your mod and whether it should be public or private and then create the GitHub repository. Copy the Git URL by pressing Code => Local and then copying the URL.
For Linux developers
Append NO_CMAKE_FIND_ROOT_PATH to the end of the arguments list of find_library in CMakeLists.txt.
Command line setup
First the repository needs to be cloned.
git clone --recurse-submodules [your Git URL]Then configure the CMake project
cd [Your GitHub repository name]
cmake -DMOD_ID=MyCMod -DMOD_NAME="My C Mod" -DDESCRIPTION="An amazing mod that does things in C" -DDEVELOPER="Me!" -DDEVELOPER_URL="https://example.com" -DPREVIEW_FILE="preview.webp" -DMOD_MAJOR_VERSION=1 -DMOD_MINOR_VERSION=2 -DMOD_PATCH_VERSION=3 . -B build
For Linux developers, swap cmake with x86_64-w64-mingw32-cmake.
Don't be afraid of the long line, it's defining a lot of values you should change yourself. The version is combined as major.minor.patch.
CMake gui
You can also configure the project using cmake-gui which comes shipped with CMake by default!
Select the folder where you cloned to and create a folder where to build to (build in the screenshot below), then press configure. 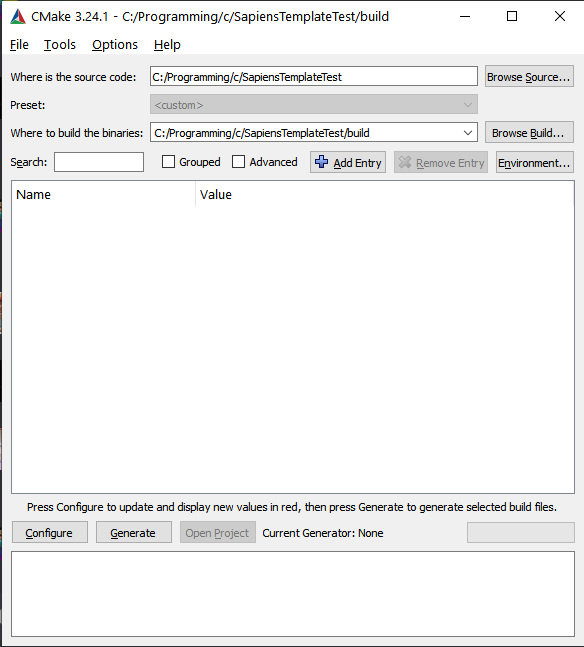
In the window that opens select the Visual Studio version you installed and press Finish. After this all settings show up in a nice gui!
After this you can build the mod.
cd build
cmake --build .
You can then find the build mod in build/[MOD ID], it should contain one file and one folder.
ls
>     Directory: MyCMod\build\MyCMod
>
> Mode                 LastWriteTime         Length Name
> ----                 -------------         ------ ----
> d----          19/08/2022    16:53                lib
> -a---          19/08/2022    14:46            300 modInfo.lua
>
>     Directory: MyCMod\build\MyCMod\lib
>
> Mode                 LastWriteTime         Length Name
> ----                 -------------         ------ ----
> -a---          19/08/2022    16:53          52224 MyCMod.dll
CLion Setup
Create a new project from version control by selecting File => New => Project from Version Control, in the UI that pops up enter your Git URL. Select where to clone to and press Clone.
GitHub Authentication
CLion may ask you to authenticate with GitHub, press Login and follow the instructions to authenticate with GitHub
After cloning finishes a window pops up asking for configuration. 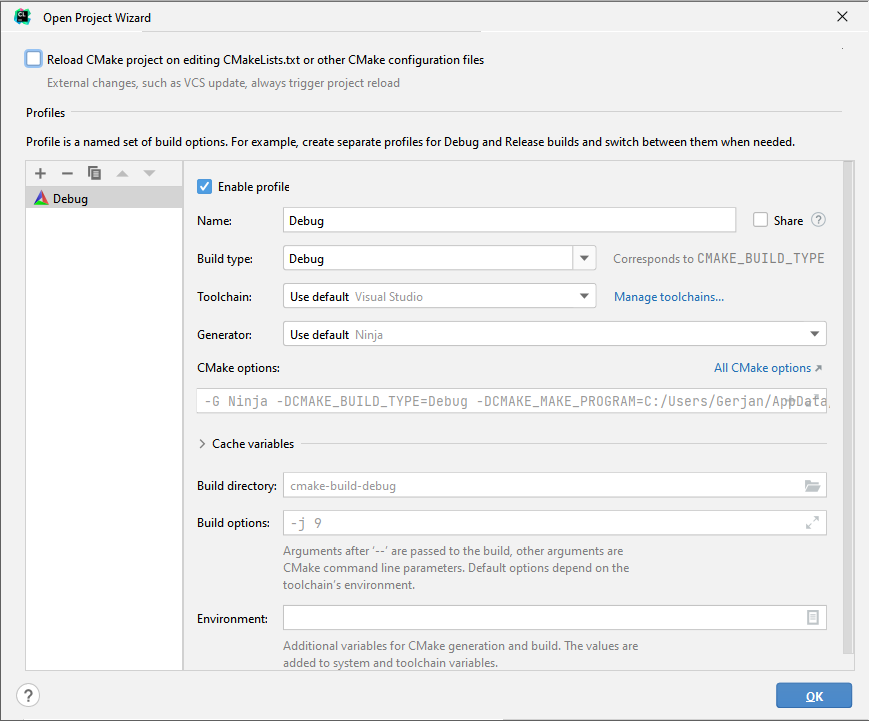 In the
 Toolchain make sure it uses Visual Studio, if Visual Studio is not available press Manage toolchains and add a Visual Studio toolchain.
Press Ok to continue.
Now it's time to configure all settings. Open the CMake tab at the bottom, press the small gear at the left of the tab and open CMake Settings. In the tab that opens you can configure the Cache variables by opening the Cache variables dropdown if it's not opened by default. Change the values to match your mod (Name, Description, etc.) and press Apply.
You can now build your mod by pressing the green hammer at the top. By default CLion uses the cmake-build-debug folder, in here a folder with as name your chosen Mod ID will be created which you can copy over to the game's mod folder (or create a symlink to).
SPVanilla
The splugins repository contains the vanilla code, this can be used as a reference when working on your own mod.
Symlinks
A symlink to your mod can be made for easy development, making it so you do not have to manually copy the folder to the game's mods folder every time you compile. The template can setup this symlink automatically, to do this the project should be configured with AUTO_GENERATE_SAPIENS_MOD_SYMLINK set to ON and with admin permissions. The symlink can also be manually made by running ni [YOUR MOD NAME] -i SymbolicLink -ta [PATH TO WHERE YOUR MOD COMPILES TO] in a powershell instance with admin privileges.
Common mistakes
Some mistakes are easy to make, here is a list of mistakes that are commonly made and their fixes.
Wrong folder name
The folder in the root folder should be named lib and not libs, if it's the wrong name the game will not load anything nor throw an error.
File in use or Cannot open file [your.dll]
When the game has loaded the mod it will keep it loaded in memory until the game is closed, this means that after testing the mod you always need to fully close the game before you can recompile or overwrite the dll. Just closing the world or going back to the main screen is not enough. Even unchecking the mod in the mods selector is not enough.